Thank You Sir. E-mail sent.
Looks like I just bought my 3rd tool from Herman.
Phoenix HPR second stage
Moderator: luis
-
sitkadiver
- Master Diver
- Posts: 458
- Joined: Wed Jan 26, 2011 11:30 pm
- First Name: Dave
- Location: Sitka, Alaska
Re: Phoenix HPR second stage
I do not believe in taking unnecessary risks, but a life without risk is not worth living. - Charles Lindbergh
-
Herman

- VDH Moderator
- Posts: 1315
- Joined: Thu Oct 25, 2007 1:45 pm
- Location: Raleigh NC
Re: Phoenix HPR second stage
I only made a small batch for the first run to see what the interest was going to be....the original 4 have already been spoken for but a parts order has already been made so more will be available soon.
Herman
-
Bryan

- Plank Owner
- Posts: 5279
- Joined: Fri Jun 24, 2005 11:40 am
- First Name: Bryan
- Location: Wesley Chapel Florida
- Contact: Website
Re: Phoenix HPR second stage
The new HPR 2nd stages are for sale and will be ready to ship to you on Monday. Please stay tuned to this thread for more product details, setup info and advice from Luis. Thank you for your patience and I hope you enjoy this fantastic new upgrade for your double hose.
Doing it right should include some common sense, not just blindly following specs and instructions. .Gary D, AWAP on SB
-
2THDIVR

- Master Diver
- Posts: 144
- Joined: Sat Jan 02, 2010 4:01 pm
- First Name: Scott
- Location: Venice,FL
Re: Phoenix HPR second stage
Just got home and my order is in.
-
luis

- VDH Moderator
- Posts: 1747
- Joined: Thu Jun 30, 2005 9:28 pm
- First Name: Luis
- Location: Maine
Re: Phoenix HPR second stage
Some stuff that I wrote due to questions at SB:
The lever looks longer than it is due to the angle of the pictures. It is a bit longer than the original RAM lever, but just slightly.
The lever does have a tiny bit more mechanical advantage than the original RAM lever, but not enough to even bother mentioning it. The big difference is not on the lever arm, but on the fulcrum and the point of reacting force (the contact point to lift the seat carrier).
One of the big advantage of this design over the RAM lever (as I mentioned before) is that there are not a lot of parts to align and I reduced the contact point of the lever to very specific locations to avoid binding.
The lever in the RAM often seems to move freely, but it is very prone to have some very small amount of binding forces (friction forces due to misalignments).
The material selection for the three contact points is related to the magnitude of the force at the contact points and the amount of sliding at that point. The maximum force is at the fulcrum. The force pushing the seat holder up is just a bit less than the fulcrum force.
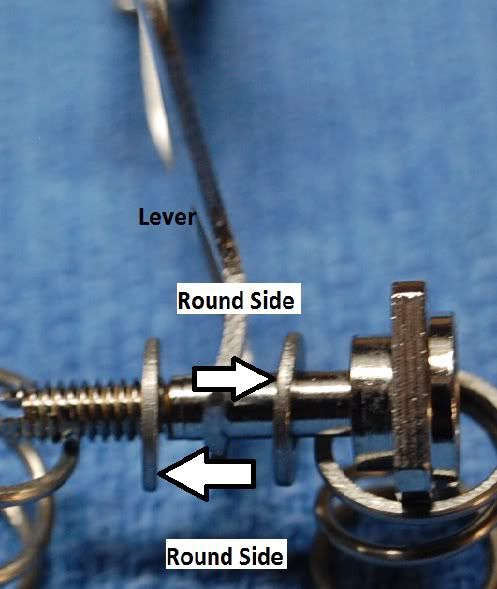
If you go to VDH in the store area there is a picture showing all the parts. There is a harder stainless steel washer under the lever that acts as the fulcrum bearing. This is an important improvement even over the Trieste lever. The HPR lever does not ride on chrome plated brass. The SS washer lifts the lever so that only the selected points make contact.
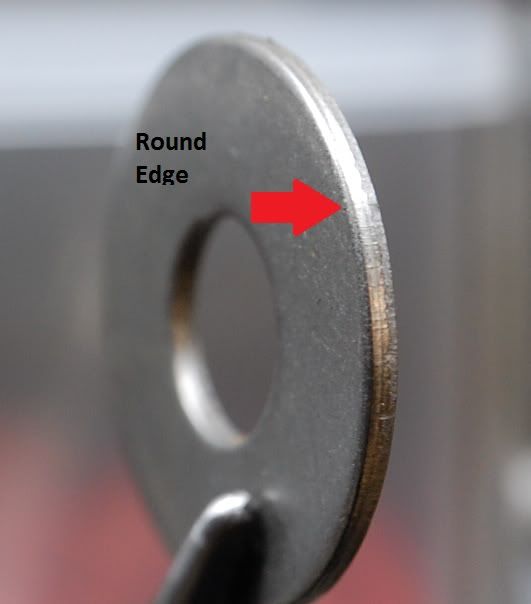
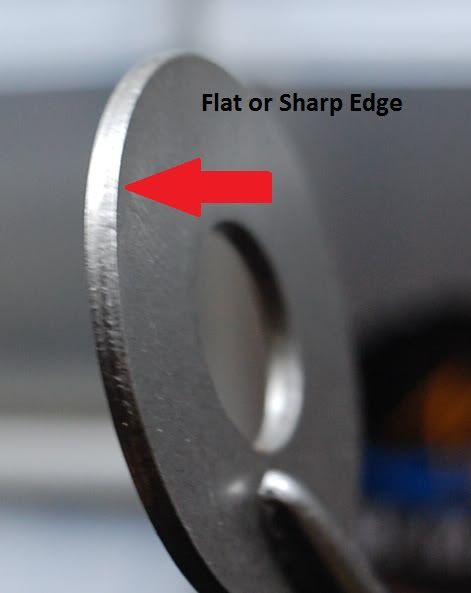
The two washers are positioned so that the smooth surfaces are facing the lever.
The force on the diaphragm is a fraction of the seat lifting force (the fraction determined by the mechanical advantage of the lever). The material at the contact points to the diaphragm was selected to work with the sliding motion (reduce friction) with the low predicted force. The diaphragm contact force is about 0.5 Lbs for 1 inWC (this is a function of the diaphragm size).
I will try to post more specific pictures and installation procedures later.
The lever looks longer than it is due to the angle of the pictures. It is a bit longer than the original RAM lever, but just slightly.
The lever does have a tiny bit more mechanical advantage than the original RAM lever, but not enough to even bother mentioning it. The big difference is not on the lever arm, but on the fulcrum and the point of reacting force (the contact point to lift the seat carrier).
One of the big advantage of this design over the RAM lever (as I mentioned before) is that there are not a lot of parts to align and I reduced the contact point of the lever to very specific locations to avoid binding.
The lever in the RAM often seems to move freely, but it is very prone to have some very small amount of binding forces (friction forces due to misalignments).
The material selection for the three contact points is related to the magnitude of the force at the contact points and the amount of sliding at that point. The maximum force is at the fulcrum. The force pushing the seat holder up is just a bit less than the fulcrum force.
If you go to VDH in the store area there is a picture showing all the parts. There is a harder stainless steel washer under the lever that acts as the fulcrum bearing. This is an important improvement even over the Trieste lever. The HPR lever does not ride on chrome plated brass. The SS washer lifts the lever so that only the selected points make contact.
The two washers are positioned so that the smooth surfaces are facing the lever.
The force on the diaphragm is a fraction of the seat lifting force (the fraction determined by the mechanical advantage of the lever). The material at the contact points to the diaphragm was selected to work with the sliding motion (reduce friction) with the low predicted force. The diaphragm contact force is about 0.5 Lbs for 1 inWC (this is a function of the diaphragm size).
I will try to post more specific pictures and installation procedures later.
Luis
Buceador con escafandra autónoma clásica.
Buceador con escafandra autónoma clásica.
-
bbain
- Vintage Diver
- Posts: 91
- Joined: Sat Jan 31, 2009 12:02 am
Re: Phoenix HPR second stage
How difficult is the HPR to install? Is it a "user install" or a "closed course, professional driver, don't try this at home" install?
-
luis
- VDH Moderator
- Posts: 1747
- Joined: Thu Jun 30, 2005 9:28 pm
- First Name: Luis
- Location: Maine
Re: Phoenix HPR second stage
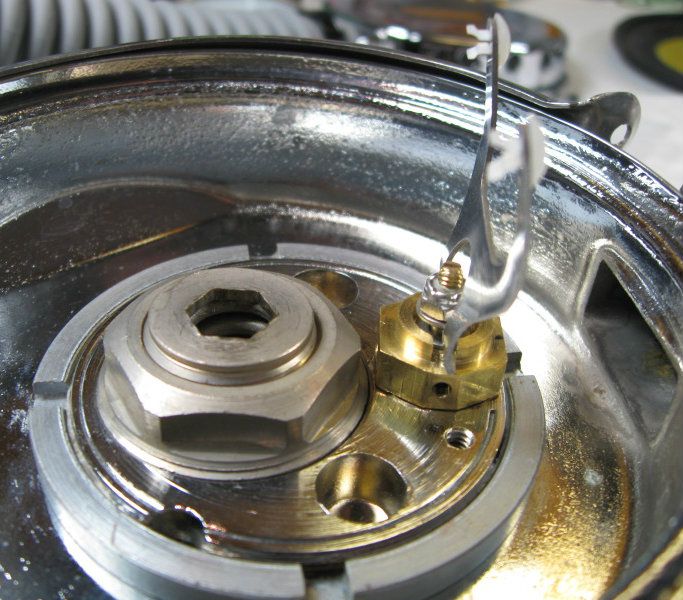
Here are some pictures of a new assembly next to a prototype.
The units are assembled before installation.
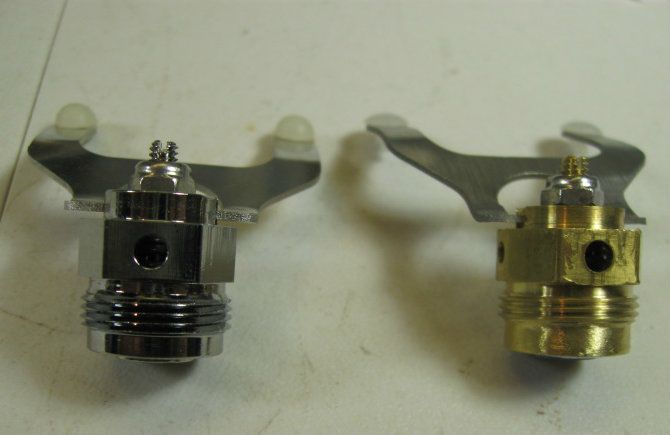

Installing the unit only requires screwing it in, making sure the venturi holes line up with the horn and locking the unit in place with the plastic washers and the screws on the side.
Here I am removing the prototype assemble. Notice that I lift the lever to retract the seat. This saves the seat from being cut by the volcano orifice. This is an important step when installing or removing the assembly.
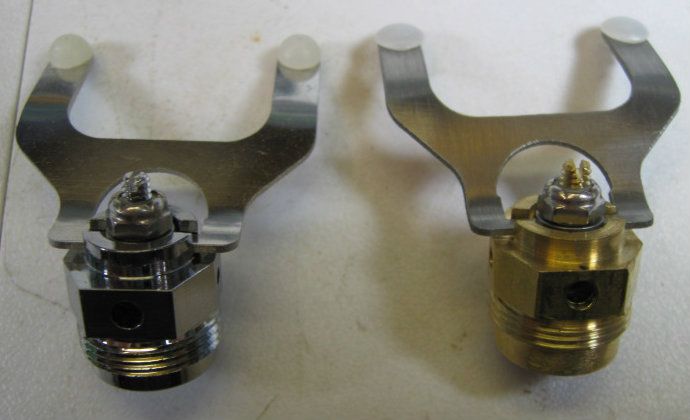
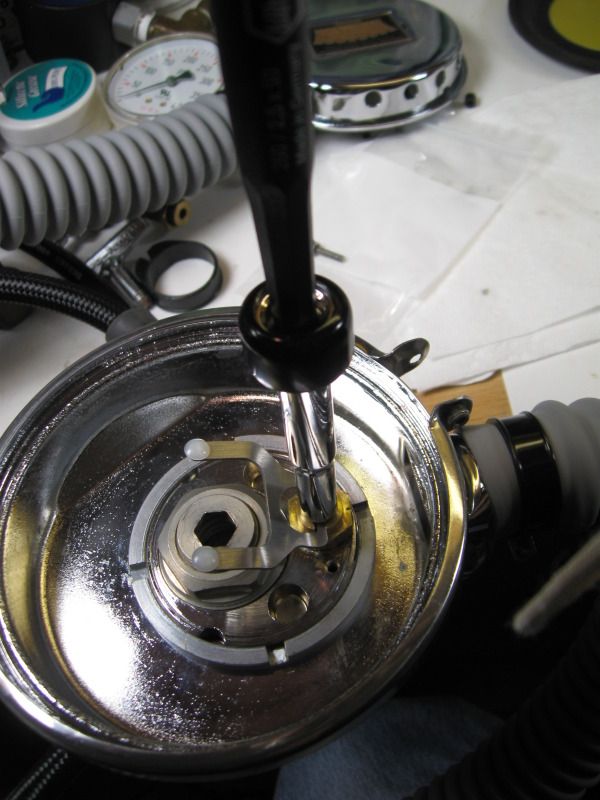
Here are two methods of adjusting the lever height.
The first method uses the same special tool used to adjust many Aqua Lung single hose second stages. As mentioned before, Herman is making a functionally identical tool for a very reasonable price.
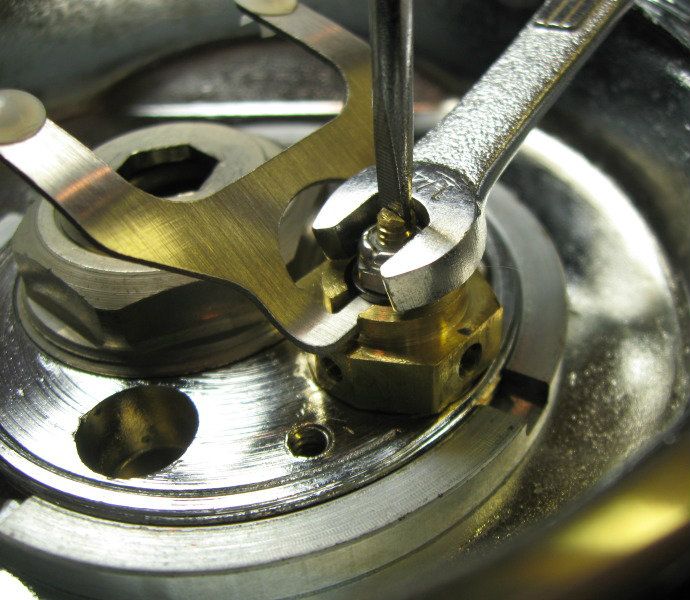
The second method just uses a small flat blade screw drive to hold the seat carrier from turning and a 1/4” open end wrench to adjust the nylon-lock-nut.
Either method works. It is more of a personal preference.
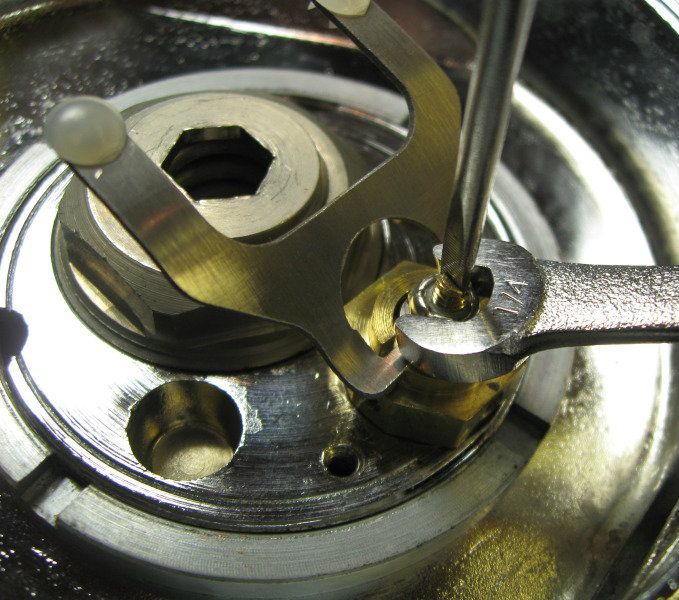
Once the lever height is adjusted, you should never need to adjust it again unless you disassemble the unit. You can replace the soft seat without affection the lever height adjustment.
This unit is not sensitive to precise lever heights. The minute height change from installing a new seat is totally insignificant with this unit. You actually should adjusted with a small gap between the lever and the diaphragm (there is no need for the precise adjustments needed in a single hose second stage).
When it comes to normal servicing of the second stage all you have to do is the following (this assumes there is not excessive corrosion or any foreign matter):
• Remove the unit.
• Remove the seat.
• Soak the entire assembly in vinegar for just a few minutes.
• Rinse with lots of fresh water while moving the lever to make sure all surfaces are rinsed.
• Dry with clean compressed air.
• Install new seat.
• Re-install unit on regulator.
• Check lever height.
• Check everything on regulator is functioning properly.
• Go diving.
If it is necessary to disassemble the unit due to excessive corrosion, etc., the process is very easy and basically intuitive. The only item to notice is that the two washers are installed in the correct location and that the smooth rounded edge surface of both washers are facing the feet of the lever.
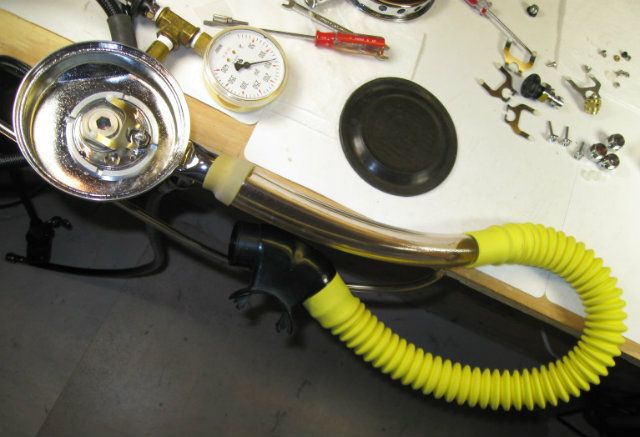
This picture is just of part of my regulator work (the rest is more of a mess). If you notice the clear tube is one of the places where I measure inhalation suction (I also measure it at the mouthpiece with a different set up). I use this set up to remove the variables introduced by the hose loop.
Very important to notice that there is a mouthpiece with a check valve that is open to ambient. This works to vent excess air flow when I am adjusting the venturi effect. This is very important to protect from over pressurization injuries.
You may also notice the IP gauge reads 130 psi. The regulator is mounted on the test bench outlet. The scuba tank air source is to the left of the bench.
The units are assembled before installation.
Installing the unit only requires screwing it in, making sure the venturi holes line up with the horn and locking the unit in place with the plastic washers and the screws on the side.
Here I am removing the prototype assemble. Notice that I lift the lever to retract the seat. This saves the seat from being cut by the volcano orifice. This is an important step when installing or removing the assembly.
Here are two methods of adjusting the lever height.
The first method uses the same special tool used to adjust many Aqua Lung single hose second stages. As mentioned before, Herman is making a functionally identical tool for a very reasonable price.
The second method just uses a small flat blade screw drive to hold the seat carrier from turning and a 1/4” open end wrench to adjust the nylon-lock-nut.
Either method works. It is more of a personal preference.
Once the lever height is adjusted, you should never need to adjust it again unless you disassemble the unit. You can replace the soft seat without affection the lever height adjustment.
This unit is not sensitive to precise lever heights. The minute height change from installing a new seat is totally insignificant with this unit. You actually should adjusted with a small gap between the lever and the diaphragm (there is no need for the precise adjustments needed in a single hose second stage).
When it comes to normal servicing of the second stage all you have to do is the following (this assumes there is not excessive corrosion or any foreign matter):
• Remove the unit.
• Remove the seat.
• Soak the entire assembly in vinegar for just a few minutes.
• Rinse with lots of fresh water while moving the lever to make sure all surfaces are rinsed.
• Dry with clean compressed air.
• Install new seat.
• Re-install unit on regulator.
• Check lever height.
• Check everything on regulator is functioning properly.
• Go diving.
If it is necessary to disassemble the unit due to excessive corrosion, etc., the process is very easy and basically intuitive. The only item to notice is that the two washers are installed in the correct location and that the smooth rounded edge surface of both washers are facing the feet of the lever.
This picture is just of part of my regulator work (the rest is more of a mess). If you notice the clear tube is one of the places where I measure inhalation suction (I also measure it at the mouthpiece with a different set up). I use this set up to remove the variables introduced by the hose loop.
Very important to notice that there is a mouthpiece with a check valve that is open to ambient. This works to vent excess air flow when I am adjusting the venturi effect. This is very important to protect from over pressurization injuries.
You may also notice the IP gauge reads 130 psi. The regulator is mounted on the test bench outlet. The scuba tank air source is to the left of the bench.
Luis
Buceador con escafandra autónoma clásica.
Buceador con escafandra autónoma clásica.
-
Bryan
- Plank Owner
- Posts: 5279
- Joined: Fri Jun 24, 2005 11:40 am
- First Name: Bryan
- Location: Wesley Chapel Florida
- Contact: Website
Re: Phoenix HPR second stage
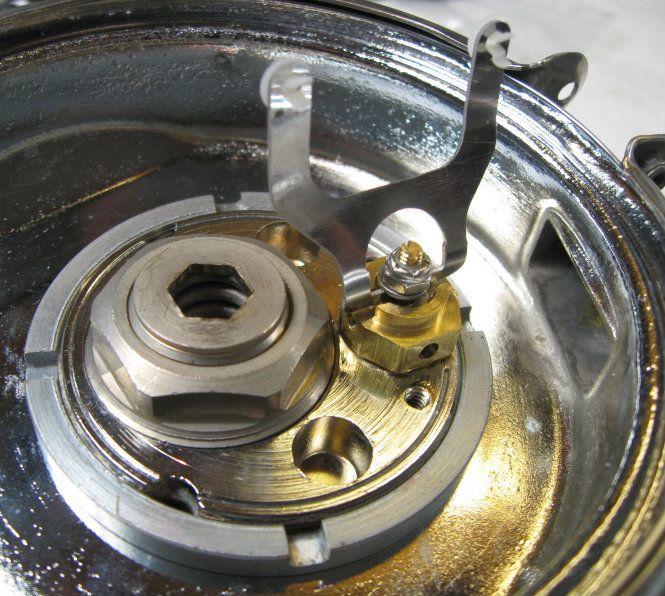
I hope this helps explain the washers a little better. Once again the round edge of the washer should be touching the lever itself top and bottom.
You can usually feel the edge difference with your finger.
You can usually feel the edge difference with your finger.
Doing it right should include some common sense, not just blindly following specs and instructions. .Gary D, AWAP on SB
-
luis
- VDH Moderator
- Posts: 1747
- Joined: Thu Jun 30, 2005 9:28 pm
- First Name: Luis
- Location: Maine
Re: Phoenix HPR second stage
I have been doing some testing with the two stage diaphragm with the metal disc, in combination with the new production parts, and what I have tested so far works well. It actually breathes extremely well… maybe a bit too good (I know this sounds odd). Just be aware of the higher potential for some minor free flow (more like some bubbling).
The potential for some bubbling will be again more likely when the exhaust is above the diaphragm… like when you are on your back looking at he surface.
If you decide to try the metal plate diaphragm, make sure the tabs do no interfere with anything. You can either line them up on the sides of the new lever, or better yet bend them flat.
For most divers I still think that the single stage diaphragm is probably a better choice. It will provide an excellent breathing regulator with superb reliability. The metal disc diaphragm pushes the performance closer to the edge.
I personally like pushing the edge, but I will recommend against it for those who dive in near freezing water temperatures. These regulators (actually most double hose regulator) are very robust against freezing free flows, but there is no point on pushing the limit.
The venturi effect on the production units is also extremely good. It actually is a bit better than the prototype. In the unit I am testing there is really no need to block the bleed air port in order to get close to maximum venturi effect. I can actually only partially block one of the two bleed holes before the venturi becomes too powerful.
You can tell the venturi effect is too powerful when you take a medium to deep breath and more air goes out the exhaust than you are inhaling. Actually, it is too powerful if any air is wasted out the exhaust while you are inhaling no matter how hard you breathe.
It is not recommended to tune the venturi effect too close to the edge. There are too many variables that will affect the venturi and it can make it somewhat unpredictable.
Luis
Buceador con escafandra autónoma clásica.
Buceador con escafandra autónoma clásica.
-
panheadron
- New Member
- Posts: 5
- Joined: Thu Mar 17, 2011 8:49 pm
- First Name: Ronald
Re: Phoenix HPR second stage
Hi Luis. From myself,& all of the other Vintage divers, thank you for your engineering. All questionable areas have been covered. Thank you also to Bryan for making the HPR available! Can't wait to try it!
-
swimjim
- Master Diver
- Posts: 1694
- Joined: Thu Mar 23, 2006 12:28 am
- First Name: Jim
- Location: Belgium WI
Re: Phoenix HPR second stage
My HPR arrived today. Thanks to the detailed photo's in this thread installation was a snap. I'm really looking forward to getting it wet. It will be this weekend weather permitting. Can't wait. The reg breaths like a champ on the bench. I haven't even cranked up the venturi effect...yet.
Jim
Jim
-
luis
- VDH Moderator
- Posts: 1747
- Joined: Thu Jun 30, 2005 9:28 pm
- First Name: Luis
- Location: Maine
Re: Phoenix HPR second stage
Installing the HPR second stage.
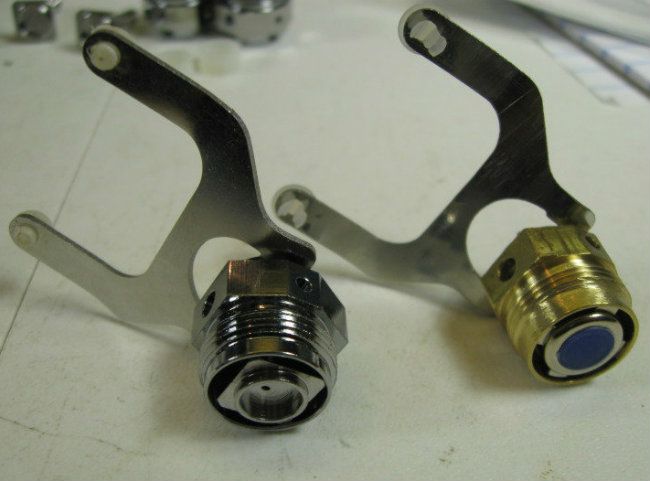
My understanding is that Bryan is shipping the second stage assembled, but without the lever in place. The lever can be installed by pushing the seat carrier in and slipping the lever between the two washers. The only issue is that you can install the lever in two positions, 180 degrees from each other.
So here is a detailed step by step procedure to determine which nozzle port should be pointing down the horn as your venturi port. It looks like a lot of steps, but once you read it, you will see that the whole process can take less than 5 minutes (before you can go diving).
1) When you receive the HPR take it completely apart noticing the direction of the two washers.
2) Screw the (empty) second stage body into the regulator until it bottoms out.
3) Back it up until the first nozzle (large hole) points down the horn. This will be your venturi port.
4) Mark that port with either a permanent marker or something you can erase (or a small piece of tape, your choice.
5) Assemble second stage (seat holder, spring, second stage body, two washers, and nut), but only screw down nut a couple of threads. Make sure rounded faces of washers are facing each other.
6) Push seat holder into second stage body (against spring) and insert lever between the washers. The lever should point away from the selected venturi port.
7) Screw nut down until the screw driver slot is completely exposed.
8 ) Lift lever vertically (as shown in picture above) and screw HPR into regulator. Grab second stage body to screw it in. Do not grab the lever in the vertical position to screw in second stage.
9) Adjust lever height (as shown in pictures above).
10) Test regulator performance. Check and adjust IP if needed.
11) After testing, install the two locking screws with the washers. Note: only one locking washer and screw is needed, but it doesn’t look as finished with the empty screw hole.
12) Go diving
I hope this is clear.
Change: I changed the bullets form to numbers in order to make it easier to identify the steps. It will also make it easier if anyone has questions about a specific step.
Note: Steps 5 and 6 can be combined into a single step were you assemble the unit with the lever in place between the two washers.
I personally find it easier to slide the lever between the washers after the initial assembly (assuming the nut is has just been treaded about two or three turns). Which method you use is a personal preference.
Luis
Buceador con escafandra autónoma clásica.
Buceador con escafandra autónoma clásica.
-
Drado

- Master Diver
- Posts: 682
- Joined: Mon Feb 07, 2011 6:11 am
- First Name: Eduardo
- Location: Manila, Philippines
Re: Phoenix HPR second stage
I may have missed it, but for this 2nd stage, is there a particular optimum IP?luis wrote:
10) Test regulator performance. Check and adjust IP if needed.
_______________________________
Ed
Ed
-
luis
- VDH Moderator
- Posts: 1747
- Joined: Thu Jun 30, 2005 9:28 pm
- First Name: Luis
- Location: Maine
Re: Phoenix HPR second stage
Drado wrote:I may have missed it, but for this 2nd stage, is there a particular optimum IP?luis wrote:
10) Test regulator performance. Check and adjust IP if needed.
No, the IP should not need to be changed, but it is always a good idea to check it whenever you are making changes to a regulator. That is the reason I said adjust “if needed”.
The original second stage might have required a very high IP in order to get it to perform.
In the past I have used IP of 150 psi or higher in some RAM and the original PRAM.
The new HPR second stage works well without the need of very high IP. Therefore, if you have previously adjusted the IP up around 150 psi (or even higher), you may want to bring it back to a normal range around 130 to 140 psi.
Luis
Buceador con escafandra autónoma clásica.
Buceador con escafandra autónoma clásica.
-
Greg Barlow

- VDH Moderator
- Posts: 525
- Joined: Wed Jul 20, 2005 1:26 pm
- First Name: Greg
- Location: SW Ohio
Re: Phoenix HPR second stage
Okay, call me a sceptic, or a Doubting Thomas...
I have been fortunate to have been part of the "pre-production dive team" on a number of the items offered by both VDH and The Scuba Museum. I didn't have the oppoturnity to test dive the new HPR second stage mechanism, and to be quite honest, I was a bit sceptical about the claims. Sure, Bryan and Luis are both upstanding guys, and I've yet to hear any BS rolling off their lips. But... I doubted as to whether the production HPR could offer marked improvement using a "drop in" approach. I figured that the prototype regs had been the subject of much fine tuning, and that made up the bulk of the performance increase.
In today's mail, I found a package from VDH containing a shiny example of the HPR mechanism. My first impresssions were that the machining and finish were of exceptionally high quality. Okay, they're pretty, but that doesn't make the reg work any better, I thought.
I carefully followed the direction posted on this thread pertaining to the assembly and lever adjustment. Regarding the lever height, I turned the adjusting nut clockwise until I could hear a barely audible leak. I then turned the nut counter clockwise from a 12:00 to 10:00 settting. Upon checking the height with a straight edge, it was dead even with the top of the can. Bryan was right on with his suggestion.
After assembling the cans, I checked the cracking effort, and found it to be a remarkable 0.7". Then, I hooked up my IP gauge, and found that the pressure was a rock solid 145psi. My doubts began creeping back... Sure, it looks good, but that high IP is making a big difference as well, I surmised. I disassembled the cans again, and adjusted the IP down to 130psi. I then readjusted the lever height using the same 12:00 to 10:00 setting. After all, a higher IP does effect the lever height, right?
Again, the reg went onto the cylinder. This time, I was pleasantly shocked to find that the cracking effort remained at 0.7".
All I can say is, gentlemen, you have brought the double hose regulator into the modern world. I used to wish that Aqualung would release the Mentor to the public. There is no need for such a product, as we now have something superior.
Well, done, my friends. Well, done!
Greg
Greg Barlow
PADI Assistant Instructor
TDI Adv. EAN
TDI Decompression Procedures
IANTD Full Cave
NSS/CDS Full Cave
PADI Assistant Instructor
TDI Adv. EAN
TDI Decompression Procedures
IANTD Full Cave
NSS/CDS Full Cave
Return to “Phoenix and Argonaut Specialty Area”
Who is online
Users browsing this forum: No registered users and 26 guests